

February 7, 2025
Boy Bedroom
Blue bedroom for total blue enjoyment.

Armoire Flip
Storage. I cannot emphasize storage enough!
Having a small house makes it very easy for things to become cluttered easily. You set one thing down on a flat surface and it all goes down hill quickly. So I needed to have plan and a place for everything. I didn’t want a desk because it would have just become another eyesore. I needed a shut it and forget it solution. Thus I decided on the armoire “office” with doors.
I like things to have character. I am a huge fan of curves and arches for all kinds of things, so obviously an armoire was the perfect way to incorporate this. I watched the local Habitat for Humanity Restore page every week for a long time waiting for the right thing to become available. I was so excited when I finally saw the one. It was an old television cabinet that already had divided sections in it. I called my husband and showed it to him. We paid for it over the phone so that they would hold it for us.

It wasn’t in as good of shape as I hoped so we used some wood glue and clamps. Then we got to work. I started off with different ideas than I finished with, but I loved how it turned out.
Originally, I was going to have a metal back so that I could use magnets to hold things. I ended up changing my mind and going with peg board. This way I could hang a variety of sizes of storage baskets. I got this Pegboard basket kit to hang things on the back wall. And we could easily cut holes in it to put electrical cords through. I bought a small square power strip that had both standard plugs and usb ports. Peg board is not the most beautiful thing to look at, so I needed to do something to make it fun. I went to Lowes and looked at their tiny sample size paints. I found this salmon pink color. On a wall, no way but for a pop of surprise color on the inside of an office armoire, It was perfect. We painted the peg board and then sprayed it with a blast of glitter spray paint. I love glitter! Everything else was painted a clean white.

The top doors of the cabinet pushed back into the sides of the cabinet. If you look at the picture you can see the drawer like slides on each side. This was great. I could actually sit there and work when I wanted without feeling trapped in at all. I did add a Motion activated light. It turned on when the doors opened and was a great extra little feature.
I had some Magnetic locks leftover from our kitchen renovation, so I added these to the top cabinets as well. It kept the kids out of things so they didn't magically disappear. It was nice going to get a pen or tape and it actually being there! (If I didn't already have some I probably never would have thought to do this, but I was glad I had it left.)
I talk about having a place for everything and this was the first time I was able to come up with my own organization system for everyday life. On the door, each kid had their own basket. If there was paperwork or permission slips, I kept them in their basket and I didn’t have to worry about them getting shifted into another pile and lost. I had another basket on the other door that I had the paperwork that I was dealing with on a fairly regular basis. It worked great knowing where all of that always was. I used these super strong Sticky hooks and hanging file baskets. It worked perfectly!
I also like to get woven storage baskets in place of drawers.
Originally I had planned on leaving the exterior just a sanded down sealed wood, but it was not in good enough condition for this to work out. I picked out this antique white and paired it with some antiqued mercury glass knobs. Even though it wasn’t what I originally pictured, I loved how it turned out.


Even after renovations (which made my kitchen a million times better) we still had limited space that I needed to optimize. I found some awesome products that made a huge impact for a compact design.
I absolutely love Joseph Joseph brand. I bought their utensil storage tray for our silverware. It worked out so well I bought a second one for additional items. I was able to keep all of our utensils in just a small drawer instead of having everything laid out taking up unnecessary space.

Narrow drawer knife block. I was excited to find this narrow knife block. It allows you to keep your knives safe in a narrow space. I bought one of these again for our new kitchen.

Pot strainers are the best. If you have kids and do a lot of mac and cheese or other things that require quick draining, these things are going to be your new best friend. No need to dig out a bulky colander that is a pain to wash. This thing gets the job done quickly and cleans with a quick swipe.

This thing was so nice. I could use it to store the dishes to air dry, but then when they were dry and put away I could collapse it down and store it under the sink out of sight and leaving more space on my counters.

I think that dish drying mats are great. They absorb more than towels but they are not bulky like a drainer would be. You can hang it on a hook under the sink, throw it in the washer easy, and it is just a great thing that I think should be in every kitchen.

Spice Rack. Rather than just jamming all of my spices into the cabinet like I had previously and digging through them every time, I decided to optimize my space and organization to get spice racks that fit in my cupboard.

I realize the next two are part of the kitchen renovation themselves, but I cannot emphasize enough what a difference they made in my life.
This is an absolute must. Our old sink was 6inches deep and could fit nothing. Doing dishes was a nightmare. Not doing dishes caused more of a nightmare. Having the giant sink changed everything. Then when our house burned and we were forced to move ,going back to a small double sink was no fun at all. My sink was one of the things that I missed the most.

Pulldown high arch. You can fit your big pots and cookie sheets under it easy, you can spray the entire sink out, and you only have to have them drill one hole in your pretty countertop.

For the boy’s bathroom, I wanted something fun and masculine. Not young kiddish but something that they will enjoy having for years to come. So, I let them help make a lot of design decisions with me. (By this I mean, I listened to their likes and dislikes and found options that I approved of. Then I let them pick from there.) My husband and the boys both loved all of the matte black options, and they are sleek, so I didn’t mind.
So, I started my design for the boys bathroom from a picture that I saw that had a dark blue vanity. I really liked it. The picture had a white hexagon tile floor with black grout that was really neat looking. So, I started off with a hexagon theme. However, the more I thought about it, the more I realized that I did not want a tile floor in their bathroom. The thought of cleaning grout around a teenage boy’s toilet was just a big no-no. I decided to carry the Luxury Vinyl Plank through their bathroom as well.
The hexagons were still a fun accent, so I wanted to incorporate them somehow. I ended up adding them to the cabinet knobs and the shower curtain. (I love it, but if someday hexagons make me feel the way my old gold toilet did, they are things that can be easily changed.)
For the cabinetry color we chose to go with Sherwin Williams Indigo Baltic. Storage is important in a bathroom and having two boys share a space, it was necessary that they each had their own area within the space. So, I put the sink in the middle and each boy got three drawers on either side of the sink.

Just like in my bathroom, I wanted to go with a one piece top but have it multi colored so I ordered Corian again. I wanted a light concrete gray color with white sink. When we were at the countertop store, I had narrowed my decision down to two options. I showed the boys and they both immediately picked the same one (which was the opposite of what I was leaning toward) and so we went with it. I mean if they can agree on something, then it’s a win for me. We chose the Delta Arvo faucet in black (I have the same model in nickel in my bathroom).
For the vanity light, we kept with the black and found some square glass with slightly rounded corners.
We chose a Black framed mirror with rounded corners that complimented the look.

I found the neatest toilet paper holder. Instead of that spring holder that you have to get in just right, this one has a bar that just lifts up and you drop it on. Then you put it back down and it is held in place. It is pretty fabulous! (I have the same one in nickel in my bathroom.) There was a matching towel bar available.
We went with the pull-down cellular shade in blue for the window.
And I love our stone bath mat. Not water everywhere or soggy towels and rugs. These things are great. I have one in all of our bathrooms.
For this next detail you have to understand that I spent a lot of time thinking and rethinking every detail of my house. I knew how my kids seem totally content to live in a disaster zone. So, I spent time trying to figure out how I could make it as easy as possible for them to keep things cleaned up. I got to thinking about how houses used to have laundry chutes. Having my laundry upstairs didn’t make this seem necessary but it did spark a thought. My laundry room is on the other side of the wall to the boy’s bathroom. Instead of a laundry chute, I decided to add a laundry pass through. The boys open their cabinet door and drop their clothes in, and that’s it. When it’s time for me to do laundry, I have a drawer that opens in my laundry room, and I can pull out all of the laundry. It’s fabulous! (When they remember to use it. Ugh. I really do try.)

They boys wanted a tub/shower combo, so we went with a fiberglass model of that. They picked out a bathtub/shower faucet from the Delta Modern 14 Series that they liked the first time that they went to the hardware store. And they stuck to their choice every time we looked. It actually worked out perfect with all of the other rounded corners that I picked out.

Note: This is the story of my decisions for designing our new house. I have listed many of the products and design choices that I have chosen because I find it so annoying to find something that I like and then am never able to find out what it was. So I have decided to use all of the work that I have done to share my story and hopefully help you make some of your own decisions. I wanted to give you a resource I wish I had. Happy Planning!
My oldest is somewhat of a sentimentalist. He wanted to keep a lot of things the same as he had them before the fire. He wanted the same color room, same Christmas stocking pattern, and same styles of anything he could find. So it ended up being a lot easier for him to make decisions than his brother who wanted nothing to be the same.
Throughout my blog you will hear me complain about the size of samples. This room ended up being a real shocker for us.
He wanted a color that was the same as what he had in the old bedroom. We picked out the sample that we thought looked so much like the old room. He chose Sherwin Williams Smoky Blue. The sample piece looked so much like what we remembered his old room being. When we saw it on the wall, it was not remotely like the color I was expecting. It was WAY darker. Don’t get me wrong, I love the color of it. It is deep and moody (just like a teenage boy) and it looks great with all of the dark wood that he likes. It is a very attractive color, just not what we thought it was going to be. He loves it though, so I'm not complaining about the end results.

He chose to go with gray accents for things since they looked nice with the deep blue.
Because we have really beautiful wood trim around the windows I chose to go with pull down blackout cellular blinds in the bedrooms instead of curtains. I was excited to find gray ones! His brother has the same on in blue. What is awesome about it is that they are both white on the outside, so when everyone is closed up tight we all look like we match.
Nightstand – Drawers! A place for chargers and cords, wallets and chapstick.
Comforter – I had both my kids get reversible comforters. It gives them the ability to change up the room if they want using what they already have. I’m all about multi use and being resourceful. So the teen room with gray accents light gray/white with abstract gray pattern option.
Storage cubby – I love storage cubbies for kids. They can use it as book shelves or to showcase trophies. And I usually get a couple of baskets for storing smaller objects.
Rug – He wanted something abstract. The placement of his closet gives him a long narrow room with a nook for a study area. With the shape of his room he liked the idea of a runner beside his bed rather than one taking up all the space.
Study Area

Because we wanted large closets in a square room we ended up with an L shaped area. My son calls it his nook. We put a light above his desk for him and he helped his dad make that really cool live edge walnut desk. It is gorgeous. (I'll make a post about it eventually.)
The Closet

Instead of buying dressers so end up with overstuffed and broken drawers hanging open, we decided to go with walk in closets in all of the bedrooms. The boys bedroom closets are 8 feet long and 4 feet deep. They have a double bar and shelves on the long wall and shelves up the side for stacking folded clothes. I did put a Sterlite drawer cart in them for socks, underwear, etc. In theory this is so much better than dressers. In reality they still have a terrible time keeping things clean. I’m holding out hope for this.
Note: This is the story of my decisions for designing our new house. I have listed many of the products and design choices that I have chosen because I find it so annoying to find something that I like and then am never able to find out what it was. So I have decided to use all of the work that I have done to share my story and hopefully help you make some of your own decisions. I wanted to give you a resource I wish I had. Happy Planning!
My youngest son loves blue. Blue everything! So obviously he chose everything for his room to be blue. He’s also an artsy type, so the shades of each blue thing had to be the perfect shade of blue. Do you know how many shades and tones of blue there are? So you can’t imagine the hours spent looking at paint samples and scrolling the internet for blankets and rugs and curtains.
Picking out a paint color is so intimidating. You get a 2 inch sample and are expected to judge what it will look like in an entire room. I left the bedrooms entirely up to the boys. He said he wanted light blue. The blue he picked was nothing like what I was imagining. It is more what I would have considered bright blue. When I walked in I thought, “oh wow”. He walked in and loudly announced. “I LOVE my wall color!” He was thrilled and because he was, then I was too. Wall Color: Sherwin Williams Secure Blue

Rug – Blues and abstract (Not that you can usually see his rug)
Because we have really beautiful wood trim around the windows I chose to go with pull down blackout cellular blinds in the bedrooms. We found these nice ones in blue, of course.
Storage cubby – I love storage cubbies for kids. They can use it as book shelves or to showcase trophies. And I usually get a couple of baskets for storing smaller objects.
Nightstand – Drawers! A place for chargers and cords and flashlights.
Comforter – I had both my kids get reversible comforters. It gives them the ability to change up the room if they want using what they already have. I’m all about multi use and being resourceful. So the blue room got a navy/light blue option.
He also didn’t want to get any other decorations for his room because he wanted to make them all himself. Get these for hanging canvases.
The Closet
Instead of buying dressers so end up with overstuffed and broken drawers hanging open, we decided to go with walk in closets in all of the bedrooms. The boys bedroom closets are 8 feet long and 4 feet deep. They have a double bar and shelves on the long wall and shelves up the side for stacking folded clothes. I did put a Sterlite drawer cart in them for socks, underwear, etc. In theory this is so much better than dressers. In reality they still have a terrible time keeping things clean.
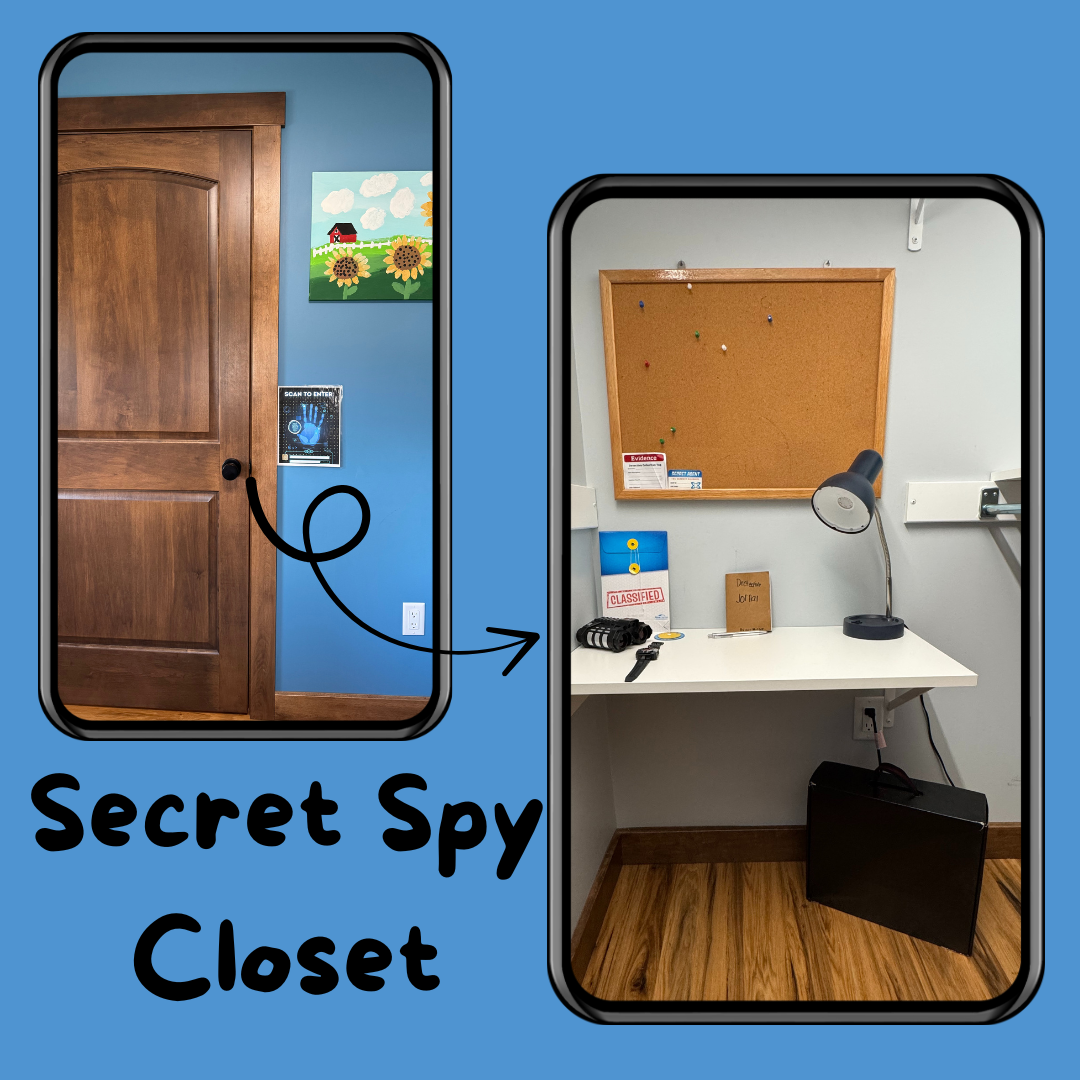
Besides blue, he loves all things SPY! So since after all the loss we suffered from the fire, I was trying to make the house a special place for the boys. I came up with the idea to make him a surprise SPY room inside of his closet. I had the builders skip one of the shelves going up the side and made space for him to have a mini desk. I had an extra wall outlet installed there and bought him a little gooseneck desk lamp. We hung a bulletin board. And we bought some spy gear and a spy kit. I printed out a hand scan picture that I found on Pinterest, had it laminated and hung it outside of his closet door. It was a total hit! It was a good surprise for a special boy. He has had so much fun having his spy room.

Note: This is the story of my decisions for designing our new house. I have listed many of the products and design choices that I have chosen because I find it so annoying to find something that I like and then am never able to find out what it was. So I have decided to use all of the work that I have done to share my story and hopefully help you make some of your own decisions. I wanted to give you a resource I wish I had. Happy Planning!
I love my bathroom. It is the room in my house that makes me the happiest. My bedroom is nice and my kitchen is fabulous, but I love my bathroom! I love everything about my bathroom.
I knew the floor tile the very first time I walked into the tile department of a hardware store before I even meant to start planning. My tile is gorgeous. It is an Italian porcelain 8x8 flora design. (I can no longer find the exact one that I have.) Its fun and playful without being so busy that your eyes hurt.

Next I needed to decide on the cabinets. I wanted a tall cabinet for towels and a hamper and I nice long vanity. My husband wanted the medicine cabinet tower in the middle. Just like in my kitchen, I wanted these cabinets to go all of the way to the ceiling. I also wanted to have lots of drawers in here. Storage is important and I didn't want to waste any space. Having a specific color on the floor I needed to either match or compliment them. This was a really difficult decision because the color looks different in every light. I didn’t have a sample tile to bring home to look at in the actual room. (And I would like to take a brief moment to complain about the size of samples. How do they expect you to make accurate decisions when you only have a little 2 inch piece of paper to guess by? Ugh!) It was really a guess I decided on at the cabinet makers last minute. I was really just hoping for the best, but not confident at all. Anyway, I made a fabulous guess! I was shocked when my cabinets came in and they matched the flooring perfect! They are Homburg Gray by Sherwin Williams.
For the counter tops I decided that I wanted them to be one solid piece to make cleaning easy. And I wanted them to have a little sparkle. I chose to go with Corain. (Sorry I do not remember the name of the one I chose.) I highly suggest finding a store that specializes in countertops. They were so much more helpful than the general hardware store.
The faucets are always a place that I choose to add curve. I wanted ones with single handle for controlling the water. I chose Arvo by Delta in a nickel finish. (I chose the same one in black for my boys' bathroom.)
I wanted my bathroom to feel like a luxury retreat! I chose to bring in my sparkle here. Crystal knobs on my cabinetry, on my hand towel holder and the mini chandelier above my bathtub. I love when the sun shines through my windows and the prism rainbows are cast all through the room. I ordered decorative mirrors. And I carried over my hammered glass into the vanity lights.
And I know that the toilet closet is the popular thing right now, but the idea of it is terrible to me. I wouldn’t say I’m super claustrophobic, but the tiny of a space is a little creepy to me. But I did tuck it in behind the vanity. I found the neatest toilet paper holder. Instead of that spring holder that you have to get in just right, this one has a bar that just lifts up and you drop it on. Then you put it back down and it is held in place. It is pretty fabulous!

The Shower!
I wanted a zero entry shower. (Remember, I’m never planning to move and who knows if I’ll have trouble lifting my legs when I’m older. As I watch my parents and grandparents age, I’m trying to think way ahead.) The zero entry was going to require cutting out part of the joists. I didn’t want to mess with that so I told them to put the shortest step they could. I should be able to manage 2 inches someday.
I chose a large vertical tile in a cream color that complimented the floor tile that I carried into the shower. The large tile on the wall looks great and besides, who want to clean extra grout?
My requirements for the showerhead was a medium size head with a hand held sprayer. My husband wanted a giant rain can. He absolutely loves it. It makes me feel like I’m drowning so I’m nota huge fan. But its his shower too, so I am glad that he has it.
I chose to have niche shelving for shampoo tiled into the wall. And I got a tiny little corner shelf shin height for propping a foot to shave. Its worth it ladies!
The long linear drain makes it look very sleek. If you are like me and lose a lot of hair when you shower, you will have to clean it out every now and then. There is a hair catcher in it so your actual drain doesn’t get clogged. But it is a little gross when it comes time to do it. I would make the same decision to use it again.

The Bathtub!
My bathtub is amazing. I wanted a drop in tub. The free standing ones are beautiful, but I knew I didn’t want to have to crawl around to clean behind one. And I love having the edge around it to set my water or tea on. And sometimes when my plants are alive I will set one there to make it even lovelier. My husband is a big guy and he wanted a big bathtub. I left the final bathtub decision up to him.
Side story…Our bathtub in our original house was a sight to behold. I wanted a bathtub and I found an old cast iron one on craigslist. They sold it to me for $50. I refinished it with a kit from Lowes and had a handy man help my dad install it while I was at work. They didn’t want to take a jack hammer to the floor so they bought some brick and propped it up so the drain could be high enough to. It was 4 foot long. So tiny! And since it was cast iron and we had it in the basement the water would get cold very quickly. We used to run a space heater in the area fora half hour before a bath to get the iron warm so that the water would stay warm. LOL
So that helps you understand the desire for the tub a little more. Our tub is 6 foot and glorious. I picked out a beautiful curved faucet. And I could (and have) spend hours in it.
I found these beautiful blinds that also brought in just a touch of luxury. (I had the same one in gray at my old house and loved it. I wanted to use it somewhere again.) They compliment my mirrors very well.
And I love our stone bath mat. Not water everywhere or soggy towels and rugs. These things are great. I have one in all of our bathrooms.
When we finally got to move into our new home and people came to see the new house, my bathroom was the place I was most excited to show our guests.
FYI...For my bathroom, since this is not a shared common space I chose to use a pocket door to save on space. I did not want this any place where my children were going to be. I did not want to risk them breaking them or knocking them off track. (I don’t know how those boys manage to be so destructive???)
Note: This is the story of my decisions for designing our new kitchen. I have listed many of the products and design choices that I have chosen because I find it so annoying to find something that I like and then am never able to find out what it was. So I have decided to use all of the work that I have done to share my story and hopefully help you make some of your own decisions. I wanted to give you a resource I wish I had. Happy Planning!
They say the kitchen is the heart of the home. That is one reason that I wanted an open floor plan. I wanted the kitchen incorporated with the rest of the living area. We eat and hang out where we can all be together even if we are doing different things.
We decided that we wanted to do vaulted ceilings in the main area. I had a few hesitations about it though. Number one being I hate cabinets that don’t go to the ceiling. When you just screw cabinets into the wall and then are supposed to decorate the dust collecting tops of them. It was a big no for me. My cabinets had to go all the way to the ceiling. So we were back to 8’ ceilings. We were not happy with that either though. And we didn’t want 10’ through the entire house. So we did a lot of debating and searching for ideas.
So I eventually made the decision that I wanted the vaulted ceiling but in order to do so I needed there to be soffit above the kitchen cabinets. (I realize some people are screaming, but that’s okay. I feel the same way when I see open top cabinets. It’s all about preference and lifestyle.) They looked at me kind of oddly and said “we don’t do soffit with vaulted ceilings.” I said “Its my house. And it is the only way I can make this work.” And so they built the soffit. And let me tell you that I am so happy with it! And when it was done and the cabinets were in, they said that they really liked the way that it turned out.
Besides me not having open tops on the cabinets, what I love about it is that it defines the space. You know that that area was designed for those specific cabinets. Everything fits exactly as it is supposed to. And I think it looks cozier. They are not just cabinets on the wall. The wall is embracing the cabinets.

Our whole house is deep blues and wood, both inside and out. I love it but I wanted my kitchen space to feel a little elegant (Soft curves and shiny) while embracing the more modern masculine feel of the rest of the house. Obviously, I have the same flooring throughout the entire area but I wanted to define spaces while keeping it unified. To tie the space together I chose the same medium wood stain for my cabinets in the kitchen and living room built-ins. I distinguished their space by putting white quarts counter tops in the kitchen and a natural wood in the living area. The cabinet knobs are also the same shape, but I chose ones with vine etching in them for the living room. Then I chose to make my island and hood vent cover the same deep blue as my accent wall (Waterloo by Sherwin Williams) behind the couch and dining area table. And since I ordered the table and chairs from the furniture store, I had my counter stools stained the same brown, which matches my cabinetry.
.jpeg)
I chose the same countertops that I had when we renovated. They are gorgeous. I did change up one thing. The first time we had a sharper corner total flat edge to the countertop. It got several small chips on the edge of it. Cambria has great customer service and promptly sent someone to come and fix the chips. So this time around I added the softest curve to the edge. It still kept a mostly flat face but just enough of a curve to avoid chipping.
Our plumber works exclusively with Delta Faucets, so that put limits on our options when making decisions. That wasn’t a bad thing though because I hate when I have too many overwhelming options. It was helpful to have them narrowed down for me. Anyway, the faucet was the perfect place for me to add an elegant curve. I chose to get touch activation on my faucet. It is so convenient to just touch it when your hands have gross stuff or you are carrying things. I do give you one annoying warning...when you go other places, you feel silly when you start smacking their faucets. LOL! Another problem is the exact opposite. When people come to my house they cannot always figure out how to turn my water on. So this is something that I would say is totally preference base and I can't tell anyone what to do.
I got this one with the curved corners. These are a must in my book. If you do a lot of baking and need to wash those cookie sheets or when you have to wash a crock pot or large stock pot, this single deep basin makes a world of difference. I would never choose to go back to a short double basin. (We were forced to when our house burned down and it made me appreciate it so much more the second time around.)

This is another place that I wanted to stick with simple curves. Handles that do not close all of the way to the drawer face are a big no-no for me. I can’t tell you the amount of times I have caught my clothing on handles that stick out. So I wanted to find the simplest curves that I could. So I ended up choosing these pulls with plain arches. I also chose simple cabinet knobs. These were not the place that I wanted to draw attention, so I went with very simple. Also, cabinet hardware is one good place to save money. They are not super expensive individually but with so many, they do add up. When we had renovated our first kitchen I fell in love with some fancy ones (which were 3x more expensive) and I splurged on them. I loved them, but I also had a lot less of them that I needed. It definitely did not make the splurge list this time.

I debated on this one but ended up saying “If I’m starting over, I might as well do it right.” And I am so glad that I did. Yes, it was a major splurge but I do use it almost every day. I would definitely do it again without any hesitation.
The tile that I picked out was the exact same one I had in my kitchen before the fire. Classic Subway Tile but glitzed up a little bit. It is has a crackle glaze and is an arctic blue color. I had it laid in a 1-2-3 stacked pattern. I love it! Obviously, since I’ve picked it twice. LOL
I had this when I renovated my last kitchen. I loved it so much that I knew I had to put it in the new kitchen. And my amazing husband said, you might as well put them everywhere you like, so I have 3 mini chandeliers. One above my kitchen sink, one over my bathtub, and one in the laundry room! I love it!

I wanted pendant lighting over my kitchen island. My electrician tried to discourage me from doing this but I insisted. And I am so glad that I did! (I think he just didn't want to try to center them? But always remember to be kind, but it is your house.) I have those lights on just as much or more than the overhead lights. They light up that area but they also give a warmth to the area when I don’t want everything lit up bright. I didn’t want anything super big or loud but I also did not want just plain clear glass. I stumbled up hammered glass and I was sold. It does just a tiny bit extra to not be boring and they look elegant. (I loved it so much I also used it in my bedroom and bathroom!)

And FYI...My wall color is North Star by Sherwin Williams. The color depends on the lighting, sometimes it looks like a light blue and other times light gray. I love it!
So that, my friends are the basics of my design decisions for the kitchen. Watch for more posts about cupboard specifics and designs of the dining a living portions of the room!
After our house burned down and we decided that we wanted to rebuild on our same location, it was time to start dreaming. Did we want the exact same house plan? Absolutely not! I loved our first house, but if I was starting over, I wanted to have my own bathroom. Let me assure you sharing a bathroom with three boys was not something that I would choose.
I have no intentions of ever moving, so this is our forever home and we needed to think ahead about the years to come. So we started dreaming! What was on our definite list, what was our splurge desires, where were we happy to go more basic?
Dreaming big was the fun part, negotiating with my husband was a whole other story. I wanted to make our house only slightly larger than our original (which was under 1100square feet). I was thinking 1500-1700. He wanted a big house (over 2,200). So there was definitely some give and take that had to go on. FYI…We ended up at 1,920.
Non-Negotiables
1. Another bathroom, with an extra long soaker tub. (My husband is a big guy)

2. One large “great room” with storage. (I loved this about our old house)
3. A laundry room on the main floor
4. A mudroom separate from the laundry room (I was amazed that this one caused issue with our draftsman). Why do people think "mud" and "laundry" go together?
5. Wide doorways (My poor husband has broad shoulders used to have to turn to fit through our doorways in the old house.)
6. An area set aside for my husband to have his own space.
7. Unfinished basement. I wanted the kids to be able to ride their hoverboard or rollerblade or whatever and me not have to worry about them hurting anything.

8. 13 block basement. Our old one was super short and the extra height makes a world of difference
9. An exterior man-door in the basement. (When you have lived through a house fire that starts in the basement with you in the basement, you will understand the necessity of this)
10. Solid doors. No more of the hollow ones that mysteriously end up with holes in them.
11. Utility sink in the garage
My splurge list
I loved the way I had renovated my kitchen the first time. So I decided to do it the exact same way.
1. Sparkly white quartz countertops
2. Mini chandelier over my sink
4. Medium brown cherry cabinets (Because of the price of wood skyrocketing, we ended up having to go with maple cabinets but had them stained the same color)
5. Flat front Kitchenaid dishwasher with buttons on top and a third-row tray
6. French Door refrigerator with the water dispenser inside
7. Built-ins in my living room area
And this time I wanted to have fun tile in my bathroom! ***I ended up falling in love with one the very first time we went to the store!

Keep it basic list
1. Vinyl plank flooring. The bamboo and cork floors that we splurged on in our old house was not worth it to me to spend the money on again.
2. Unfinished basement. This was one of my non-negotiables, but it definitely helped keep costs down.
3. No lockers in the mudroom. We did not find these helpful when we had them made in our old house. Coat hooks on the wall and a long bench do the job for us.

Keeping all of those things in mind, it was time to try to figure out what we wanted our “dream home” to be. We spent hours at Sherwin-Williams, hardware stores, and scouring Pinterest. Seeing what I liked and didn’t like that other people have done is so helpful. And that is exactly why I decided to do this as part of my blog. I am glad to share about the decisions that we made so that you can see and think “yes, I love that!” or “that is definitely not my style”. I think that both are helpful.
So, if you are getting ready to dream or to make decisions about a build or remodel, this is my way of encouraging you. I hope it helps!
The house we used to live in was a tiny two bedroom, one bath (and seasonally a half bath). It was probably too small for 4 people but we made it work. We were packed in tight, but it was home and I loved it.

I was excited to begin our remodel of the interior. I had been planning it for years. We knew that we were going to need a new roof in the not-too-distant future. However, I wasn’t expecting our ceiling to start leaking while we were mid-project. I was literally standing in my kitchen talking to someone who was doing some work for us and I looked over and there was water dripping off of an electrical wire. Seriously, I was a little freaked out, but the man I was talking to didn’t seem overly phased. So, I don’t know how dangerous the situation may have been.
So we had to get a new roof before any finishing projects could be completed. We didn’t need water damage to anything new. So we called a roofing company to come put on a new roof ASAP. So that was a little stressful.

We ended up choosing a beautiful antique bronze metal roof. It looked so classy on our creamy tan brick house. We traded out our green front door for a wood look steel door. It totally changed our house. We went from 70’s yikes to Classic Modern. I absolutely loved it!
We saved up and 2 years later we added a wood look garage door. It was fabulous. Unfortunately, we didn’t get much of a chance to enjoy it. Our house burned down a month later. But it looked amazing for that month!

(I so wish I had better pictures to share, but you don’t always think about those things until it is too late. Learn from me, take lots of pictures and save them multiple places.)
I have boys. No matter the effort that I have made to domesticate them, they have an untamable wild streak. So as many times as I say "run outside", "rough house in the basement", "be careful with those handstands", it doesn't do a lot of good. The impulse to do something crazy with their body is stronger than their self-control. So how do I stay sane? Well, the truth is that a lot of the times I don't. I have found something that does help a little.
When a major mishap takes place. Like maybe a hole in the wall...

Does this hole need properly patched? Yes, yes it does.
Does my husband have time to fix it anytime soon? No, no he doesn't.
Would it drive me crazy every single time I walked down the hallway? Yes, yes it would.
I have found a quick fix for my sanity/frustration level. Let me introduce you to command strips. Not just the normal ones for hanging a poster. They make velcro ones! They are strong and secure. These are miracle workers for the busy family with accident prone boys.

Buy these. Buy these right now, so that you don't have to wait long when these holes show up. I keep them on hand and up goes a canvas when the time comes. The hole "magically" disappears. They work well for light weight frames too. I have used these for other non-emergency purposes.

The hallway was a little empty and I had indeed been looking for away to decorate it. I just hadn't made up my mind yet. The time for the project to be completed was forced upon me. When my husband has an extra hour he will patch it correctly. But until that time comes, I don't have to look at that hole every day.
You simply unvelcro your picture. He'll do whatever needs done to patch it, and then you just velcro the canvas back on. I used these for a frame at my grandmother's house that she likes to change the pictures in regularly. It has held up great. These are one of my favorite home owner products.
I'll say it again. Buy yourself some of these. You will not regret it.

So I never intended to build a house, but our house burned down and things were out of my control. Thus the building process began and what a learning experience it turned out to be.
As a homeschool family I like to have us learn about things that affect our everyday lives. And since building a house was going to be consuming our thoughts and time anyway, I decided that we were going to do one giant unity study on Building a House. We looked at every aspect of what it took to build a house.
There are tons of great resources available. We started with the house building process in general and then we worked down to all the details.
If you are someone who is thinking of for beginning to build a house and you have younger kids, I highly recommend the book How a house is Built by Gail Gibbons. It is very thorough yet written in a way that kids can understand. It was a good one for helping my 8 year old get the big picture of what all was going on.

Another great book I found is Ultimate Spotlight: Home Construction. This book has a great overview of everything that goes into building a house and I love that it is interactive. This helps reinforce all the concepts with the younger age group.

If your kids are just a little bit older, Who Works Here? Construction Site was my favorite for the ways that each job actually gets done. It seemed to break things down even more and talked about specific tools. This one was especially helpful for my 11 year old. We used it a lot. When they started doing our excavating, my kids knew all about a laser planer and the names and the massive machines that showed up. It was helpful for them to have a knowledge of what to expect next and encouraged them to talk more with the people on our job site.

When we understood the overview of building a house, then we broke it down into the details. How does the electricity, plumbing, HVAC, etc. work? This part was really interesting because as someone who has lived in houses my whole life, I just took for granted that things just work. Learning how was long overdue.
Since our house was going to have electricity, we studied electricity from the history (Franklin, Tesla and Edison), science, and types (alternating currents, direct currents, hydro, solar, etc.). If you ever find yourself at Niagara Falls, NY, I highly suggest you go visit their power plant. It has a phenomenal education area of the history, science and future of electricity.
We learned What's It Really Like to Be an Electrician? . We used books and videos along with hands on science kits. My kids really enjoyed Snap Circuit sets. We own a basic set but I also found this cool one about My Home Electronics.

Since we were having plumbing we talked about the history and science. The kids like knowing about the Toilet: How It Works. They learned about what it's like to be a plumber.
For math we practiced measuring, angles, area, perimeter, etc.. Measuring is super important. While helping on the job site my oldest got to see first hand what happens when something isn't measured correctly. A wrong size wall needs to be laid back down, taken apart, cut and rebuilt. Remember, measure twice cut one!
For art we focused a lot on color. Color theory, complimentary colors, tones, and how light affects color. We spent a ton of time at the paint store picking out samples we liked and then took them different places to see what they looked like in those lights. My younger son loved this part.

There is so much teaching to do when you do an in depth study of building a house. The older your kids the more you can dive into all the different aspects. If you are building a house or know someone who is, I can't encourage you enough to study it out. I don't remember much of what I learned in grade school, but these are lessons my kids won't forget.
Before we go and experience something new, I like to prepare them for it. We get lots of books and movies about whatever we are going to go see. Whether it be the history, science or current status, I want them to know somewhat of what to expect.
This does a few things for me. It gets the kids excited for learning. They want to know as much as they can about what they are going to get to experience. It also help
them to appreciate more when they get to see it. It puts what they were imagining in real perspective.

Colonial Williamsburg: The Story: From the Colonial Era to the Restoration
There are tons of non-fiction books available about Colonial Williamsburg. I liked that this one has a wide timespan instead of just then or now.
However I am a firm believer in the power of the story. I find for myself that the facts don’t help me much until I can bring them to life. I will always add some historical fiction into my teaching to help bring more to their understanding of time and life.

I grew up reading all of the American Girl books. I had the Samantha doll but I loved all of them. Each and every story brought history to life for me. So since I was probably 8 years old I have wanted to visit Williamsburg. When I saw that it was on our way to another destination I decided that we had to make a stop. I read the Felicity books to my boys and they enjoyed these stories too. Even though it was about a little girl her sense of adventure made my boys like her stories as much as I did.

Young American’s Colonial Williamsburg Series
These books were my absolute favorite in preparation for our trip. Though the stories themselves were mostly fictional, they talked about real kids in the real places that they lived. They give the reader an understanding of what life was like in each of the places and the types of work and troubles that people experienced at this time. For me then what was really cool was taking my kids to these places and them being able to tell me what they knew about the apothecary, magazine and the different places.

Visiting
Our trip to Colonial Williamsburg was so much fun. Be sure to get a map and schedule of the day. We opted to do the one day pass. It was fascinating and educational. It was so neat to hear the stories of the lives that took place in the very spot we were standing. Some of it was exactly what I was expecting and other things were not at all how I had imagined them. I did thoroughly enjoy our trip. My one problem was trying to do it all in a day. There is so much and we exhausted ourselves trying to get it all done and we still missed out on things that we hoped to see. If you have time on your side, I would definitely recommend staying at least 2 days.

The buildings and atmosphere were amazing. The trees were beautiful. It was an absolutely wonderful experience. I just wish we could have stayed a little longer! It was a dream come true trip for me. And the kids loved it too!

Locate It Games: Colonial Williamsburg: See Places in a Fun, New Way
This is a fun book. I recommend it if you are going to be in Williamsburg multiple days or are not planning on getting the pass to go on all of the tours. As we were only there for one day, we didn’t use it as much as I had hoped because we were on a time crunch.
And by the way, at the end of the day if you are looking for a good meal, I highly recommend Food For Thought. It was delicious. We actually drove out of our way on our way home to eat there a second time.
Before we go and experience something new, I like to prepare them for it. We get lots of books and movies about whatever we are going to go see. Whether it be the history, science or current status, I want them to know somewhat of what to expect.
This does a few things for me. It gets the kids excited for learning. They want to know as much as they can about what they are going to get to experience. It also helps them to appreciate more when they get to see it. It puts what they were imagining in real perspective.
The Creation Museum and Ark Encounter are exhibits by the ministry Answers in Genesis. They are incredible. The detail that went into every part of these places are amazing. I had actually been to both of these several years before we took the kids, so I knew what to expect and how to prepare them for it.
If you are thinking about this trip for yourself, plan to visit the Creation Museum first. When I did the trip the first time we decided to start with the Ark Encounter but I regretted that decision. I found that the Creation Museum prepares you for the Ark.

My children were 8 and 10 at the time of our trip. I found that this was the perfect age for the experience. They were old enough to take everything in with awe and understand what they were looking at. Another great kid tip…get the guidebooks! They are available for different age groups. They help the kids to slow down and focus a little more their surroundings to look for answers. My kids loved doing them and having them for souvenirs!
The Creation Museum

Journey Through the Creation Museum: Prepare to Believe
The attention to detail in this museum is amazing. From the entry through after you exit you experience history from the dawn of time.
This site had an amazing playground. I left my husband to sit and watch the kids play while I took a walk through the beautiful botanical gardens. It was the most relaxing stroll I had had in so long. We went through again with the kids and they enjoyed it as well.
Ark Encounter

Inside Noah’s Ark: Why it Worked
Ark Signs: That Teach a Flood of Answers
This is probably the most amazing exhibit I have ever scene. You just cannot serve it justice with words or pictures. Its something that you have to see for yourself to understand. I cannot recommend this enough. Not only does it bring the Bible to life, but the size and reality of the entire thing makes you think about everything in a whole new way.
Besides the Ark itself, the other things going on at the site are incredible. The zoo that they have is fabulous. My kids absolutely loved the Zonkey and the Zorse. I did too.
Both the sites had amazing playgrounds. My kids were in their glory. It was absolutely incredible at the time of our visit and they have been continuously adding more there. I definitely hope to make it back there again someday.
When I was 18 and went away to college it was so fascinating to meet people from all over who had so many different experiences in their cultures. One of my roommates had been a military kid. When her father got out of the military, they sold everything, bought an RV and homeschooled around the country. I was so awestruck. As someone who didn’t travel much, I was totally impressed with the power of learning that way. I decided then and there that that was what I wanted to do with my children someday.
I fairly promptly forgot about that decision. I had years before I would become a mom of school age kids. Then when they were of age, I was so overwhelmed that I couldn’t wait to send them to school. I needed that time to recover from the unending demands and insanity. Both of my kids were in public school all day for 6 glorious months. My house was clean, I was more productive in those months than I had been in the past 6 years. It was great. Then 2020 came around, COVID shut everything down and the kids were home. It was alright. And then come spring elections and our school levy failed. This led to summer and our superintendent threw a temper tantrum and our schoolboard decided to grade level without notice to the community. There was no to prepare and it was a disaster. Teachers were frustrated, families were frustrated, kids were confused and then to top it all off the superintendent left and we all had to deal with his mess. So between trying to come back from COVID and grade level at the same time things were a mess. I decided that since they were basically experimenting on the children anyway, I could experiment on them at home myself. My oldest was already frustrated with school and was not retaining what he needed to and I knew he was the type of kid to get lost in the shuffle if I didn’t step in for him.
So I sent in my letter of intention and started researching what I was going to do with them. I decided to take things all the way back to basics and do skill based learning and not worry about grade level at this point. I expected homeschooling to last for just one year. That would give the school system time to get their act together and my kids the focus that they needed.
It turns out that they loved it! They told me that they learned so much more at home than they did at school. I personally felt like I did a terrible job, so what on earth was going on at school? So that became our new way of life. And at that time I decided that we needed to start working in adventures. If the lessons were going to stick, I needed to make it real life for them.
I decided to make as much of their education as hands on/immersive as possible. I had no idea how deep these lessons would go and immersive we would get, but this was definitely the best way my kids have learned.
Bamboo floors were one of the things I knew that I definitely wanted. I was trying to be ecofriendly. I also knew that I didn’t want what you think of as bamboo floors, that yellowish that looks like pieces of bamboo stuck together. I also didn’t want anything to be monotone. Monotone makes me cringe. So we went with a medium/dark brown wood cabinet. This meant that our flooring could not be dark. And I didn’t want anything yellowish.
We went to Lumber Liquidators and I got all kinds of samples. I laid everything out and it was a very difficult decision. Floating or nail down? Color? And then once you pick a color sometimes you have to decide on whether you want it to be smooth or strand. The person at the store was helpful with this decision. Apparently the smooth is more likely to get scratched and on the strand it is less noticeable if it happens to scratch. With two wild boys, I chose the strand.
I ended up finding a bamboo that was itself multi-tonal. It was beautiful. Since my house was longer than wide, I hadthe flooring laid with the width, thus making the room appear wider. I absolutely loved the way it looked when itwas laid. It was gorgeous.
Then we started living on it. We found that even though they said that it was supposed to be sturdy that it scratched very easily. In the few years that we lived there, we putin lots of scratches just from little things like pulling a chair out. It did not live up to our expectations of sturdiness.
So yes, I loved it and am glad that I chose it for that project, but when it came time to rebuild after the fire, I knew that I did not want to go with it again.
The next leg of the Adventure
So once DEMO day passed and we started the work. This time we did a lot of work ourselves but hired out some of what we didn’t want to do.
I wanted drywall on my walls and ceiling, lights, bamboo floors, light colored walls, plenty of cabinet space, lots of storage, a window bench and shiny things. Also, to understand some of my design choices remember that I am the only woman living in a house full of testosterone. I add a few fancy things in with my blues and woods and it keeps everyone happy. I’ll give you one example now. This tiny chandelier.

Isn't it adorable! I hung it over my kitchen sink. It was so cute and classic but it didn’t overpower anything going on. Just a little piece of glitz in with the rest of my house.
Anyway…on with the story.
We hung the dry wall and hired someone else to finish it for us. We learned this lesson when we renovated our bathroom.
We hired a handy man who was willing to teach my husband along the way. He learned a ton about electrical work and some plumbing. This saved money during this project and a lot of future ones. Well, kind of…there is that “I will need this new tool and this new tool and this new tool”, but after you pay those off, it does save a ton of money in labor. And to be fair to him, yes he has used the tools for lots of other projects. And to bring it back around to me, I’m really good with coming up with new projects to be done. He just loves my ever-expanding list. (read that line with total sarcasm)
Because we were working with a small space we wanted to maximize every inch, so we had our cabinets custom built. This was an interesting process. I’m a person with excellent imagination vision. I can see exactly what it is going to look like at the end (as long as everything goes as planned). So I explained and drew pictures and explained where all to measure. Our cabinet maker did everything that I told him. I assumed that he was right on page with me, but that was not exactly the case. He did an excellent job. I was thrilled with them. I was so amused though when after he finished installing them, he said “wow, I didn’t know what this was going to be like. This turned out really nice.” Those kinds of conversations have happened quite a few times since then.

Another place that I added a small feminine touch was an accent cabinet. I made it a complimentary color of blue and added crystal knobs. And everybody ended up loving these because at a certain time of day as the sun was setting in the west, the light would hit the knobs and cast tiny rainbows all over the room.

I absolutely loved the way that it turned out.
A peek into the future:
I loved this so much, I made quite a few of the same decisions when we rebuilt our new house. The crystal knobs moved to my bathroom and I upped it to 3 mini chandeliers.
A few years before our house burned down, we had completely renovated our house. We took a tiny little house that was stuck in the 70s and welcomed in 2019. We planned on doing the job at some point, it just started off a little different than we planned. I dreamed about everything I would do for 10 years. We were supposed to get our house paid down and save up a little bit to do the project. My emotions/hormones got the better of me, and thus the project started.
As a stay-at-home mom there are days when you just can’t handle another thing. In those moments, you sometimes act rashly and out of character. So one fine spring afternoon while my husband had my oldest son at baseball practice my youngest wanted salsa. It was the good stuff that we bought from the Mexican restaurant that they send home in a Styrofoam cup. Well, it slipped out of his little hands and spilled all over my carpeted kitchen floor. Yes, salsa on my carpeted kitchen floor. (Everything about that sentence is cringe worthy.) It was a terrible mess and that particular day, I couldn’t handle it. The thought of trying to clean up all that salsa from the carpet was just too much. I called my husband and asked him where the utility knife was. In my defense, HE TOLD ME.
I went to the garage and found it. I came back in, moved the refrigerator and cut the salsa spill out of the carpet. Yes, you read that right. I cut a 3 foot square out of the center of my carpet. Somehow that seemed like a better solution to me at the time. Remember, my husband told me where to find the utility knife. So we lived with the hole in the carpet for almost 5 months before anything more happened.
Then there was the second surprise to which my husband came home. I had surgery in July that year and spent a couple of weeks recovering, thus spent a decent amount of time on the couch in the living room. As I laid there staring at the paneled walls, I was about to go crazy with it. One day, I called my dad and asked him to come over and take all the paneling off my living room walls. So he came over with his tools and off it came. I was happier staring at the glue and nail marks everywhere than that fake wood. So when my husband came home, it was too late and we lived with crazy looking torn up walls for 3 months.
(I wish I had more pictures but there were very few saved from the fire.)

Let me rave more about how amazing my husband is! He rolls along with all the crazy to the very best that a calm reserved person can. He’s a gift and I am so thankful that God put our lives together.
So in October, the big job actually started. The first Saturday of October our township has what we affectionately have deemed dumpster day. So the Thursday and Friday before we did our demo. This saved a ton on disposal fees. (I love the community we live in for so many reasons!)
If you have little boys, DEMO day is the BEST! Hand them some tools and let them go live their dreams. Everything you tell them not to do every other day. My dad gave my oldest a pry bar that was almost as big as him. He was in his glory!

And once everything was destroyed and disposed of, we got to go about the fun of decision making and beautification.
I loved our end results and I learned so much. As terrible as it was to watch it all burn, I am still thankful for the experience of making those decisions and learning about the process. It helped prepare me for the quick decisions that needed to be made when it was time to build our new home.
I bought my first house when I was 21 years old. It wasn’t something that I had planned on doing. My neighbor went into the nursing home and knew she was never coming home. We would still go visit her while she was there. One day she told my mom that she told her kids to sell the house. My parents were discussing it and I didn’t like the thought of anyone besides Laura living there. (You must know that I hate change.) I came home from work the next day and they hurried me into the house telling me my mortgage broker was on the phone. I asked what a mortgage broker was. And thus, I unintentionally bought a house.
I had just started dating a guy 3 months before. We were driving down the road and I said, “I bought a house today.” He was a bit shocked. I ended up marrying him a year and a half later, so it all worked out fine. Years later, I asked him what he thought when I told him that. He said, “I thought you wanted to marry me”, to which I replied “nope. At that point in time, I was so overwhelmed with life I wasn’t even sure I wanted to be dating you.” It all worked out. He moved in with me when we got married and we lived there happily for 12 years.
I really didn’t like the house all that much when I bought. It was boring on the outside and stuck in the 70s on the inside. Wall to wall carpet (including the kitchen and bathroom), honey-stained wood, all paneling and Formica. The bathroom was gold, we had a real golden throne to sit on. It was not a very pretty house. But the price was right since they liked me, and we didn’t have to get realtors involved.

So, after three years of marriage, I decided it was time to renovate my bathroom. I was not about to potty train my little boy on carpet. No way! In order to save money, we did as much of the work ourselves and kept the cabinetry. Neither my husband nor myself had any experience with anything of the sort, but we were going to make it happen. My husband is a quick study, and I’m determined, so we knew it would get done.
Some decisions were easy. I wanted it to have a serene feel, spa like. Blue walls, WHITE TOILET, cork flooring, and dark cabinets. (I was so over honey colored wood.) Other things were more difficult, like finding the perfect color of blue that was in my head. We hit up a surplus store, where we bought fixtures and tile. I bought a lot on eBay and got to know our way around Lowes pretty well. I learned a lot in this process.
1. Everything takes longer than expected.
2. Don’t rely too much on others help. When I thought would be a month took six months. When you have to wait on people to help you, time passes with me having no bathroom and them not being affected by it.
***Note, we did have a creepy half bath in the garage (We had to close it up in the winter because there was no heat or even hot water) and shower in the basement. We survived but it wasn't convenient.
3. Finishing drywall is not for everyone.
4. Though I did love my cork flooring, I chose not to use it when we rebuilt. I loved that it was not carpet and was antimicrobial. However, when you dropped super heavy things (like toilets) they leave a permanent dent. Oops.
5. Don't settle. Take the time to find what you want.

So as a first attempt, I was very pleased with our outcome. It was a million times better than what we had and made my life better. So it was worth it. A professional would not have been impressed, but I was the one living there and it made me happy!
I asked my 13 year old what he would want for Christmas if he could get anything. Here is what he came up with:


Lego Table
If you have kids between 5 and 13, there is a decent chance that you have more than your fair share of Legos at your house. My boys love Legos, so much. And thus it makes a great gift for everyone to get them. And now there are so many that you don’t know what to do. I bought my last Lego set almost a year ago and am holding fast to not purchasing anymore Legos. (You too could make that commitment. Repeat after me, “I will not buy any more Legos!”)
So when there are so many and the floor is covered it is hard for them to even play. So I decided we were going to try to elevate our Lego play. Literally.
So I drug my husband to the Habitat for Humanity store, analyzed all of the tables to see which I could picture as the best Lego table, paid and brought it home. That’s when the real fun began!
The table that we purchased was square with inset ceramic tiles. So the boys got to join in the fun breaking the tile off of the table.


Then they gave the entire thing a rough sand. This really is an important step in the process. It gives you an even surface and your paint has something to grip on too. You will regret it if you skip this step.

Then the next fun part…Lego Plates!
My kids wanted them in multiple colors, so we actually went with some knockoff brand for ours. Plus they were way cheaper!

We did the math and bought enough Lego plates to fill the table and leave some room for a road down the middle. For this we used an industrial glue and then put the Lego plates on top. We set some heavy stuff on it for a few days to make sure that they stayed flat and the glue had a chance to cure.

After that we painted the entire thing Rust-oleum matte black spray paint. We love matte black! No finger prints and sleek!

Then we moved it inside to the kids play area and the kids had so much more fun than just having everything all sprawled out all over the place. It was such a win-win!

My kids don't usually make a Christmas List. They have commented on stuff they like but have never actually wrote it down or requested something specific. Out of curiosity, I asked them to make a list just to see what they come up with.
So here is what my 11 year old boy came up with.


I had the privilege to receive a pre-released copy of Christine Caine's new book Unashamed. It was fabulous! It really is a must read for every woman.
I didn't know what to expect when I started the book. I can thankfully say that I don't have a dark past looming over me. I was never physically or sexually abused. I have always made wise, thought out decisions. Of course I have had moments where I felt guilt about something I did or said, but they were nothing more than moments, which I know were covered by the blood of Christ and really never cross my mind. Until now, I had never thought much about shame. So when I started reading this book I knew it would go one of two ways. Either I would say this is a good read and have good advice for people going through difficult circumstances or find issues in myself of which I was unaware. Both happened.
Christine defines shame as "the fear of being unworthy, and it adversely affects our relationship with God, ourselves, and others."
She gives a complete picture of the power of shame and how it takes us captive and squashes out as much of our hope and potential as it possibly can. "Shame lies" and then we believe those lies. "Shame can give our lives a shape that is nothing like the shape of the life God desires for us." She shares her story and those of a few others to tell us about overcoming the depths of different types of shame. She goes through all of the steps she has taken over and over again to have Jesus heal all of her shame. She reveals truths that we need to know. She shows us how to both get to freedom and stay in freedom.
Shame might lie, but here is a truth for you: "Jesus shamed shame".
We don't need to live under the power of shame. "Jesus paid for your guilt and bore your shame. He carried it to the cross. But there he left it!" We are "redeemed by his blood sacrifice. It is finished. The blood of Jesus has healed you. The blood of Jesus has set you free."
Is the enemy going to fight to get us back in the shadow of shame? Most definitely. There are always going to be deserts we have to cross, walls to knock down, and giants to slay. It isn't going to be easy, but we have the truth of God to combat anything he throws at us. "We never stop fighting the good fight of faith; we simply become better equipped for victory."
Christine says, "I want all women to dare to believe that God made them on purpose for a purpose. That he has filled them with gifts, talents, and abilities to be used to their full measure for his glory. I want women to stop comparing and competing with each other and instead love, support, and esteem each other as a sister in Christ. I want women to know God can use everything the enemy meant for evil in their lives for good. He can take their stories of shame and redeem them--first for their own freedom and then to help others."
Personal application:
I deal with a lot of fear. Fear of failure. Fear of rejection. Fear of what other people are thinking. And then there is the worry. Fear of the unknown and the what ifs. All of which I have no control. Then I feel guilty about that fear. Fear and Shame go hand in hand. Christine says "Shame and fear. Always together. Always the enemy's weapon of choice." Those fears are what the enemy uses to hold me down. What is going to happen to me if I step out into what I know God wants for me? What will people say or think?
Is the enemy powerful? Yes, but that doesn't mean that I have to let him have control over me. My Jesus has already defeated him. 1 John 4:4 tells us "greater is He who is in you than he who is in the world."
Paul asks in Romans 8:31, "If God is for us, who is against us?" I have nothing to fear. I have no need for shame. It's time to drop the fear/shame and fulfill my destiny.
If you are someone who has gone through what should be unimaginable, read this book. You don't have to hold on to the shame of what was not your fault. That is not how God created you. Shame is not His purpose for you.
If you are someone who has a closet full of baggage you carry with you, read this book. You can drop that weight and pick up freedom. Shame is not his purpose for you.
If you are someone who seems to have it all together but experience turmoil inside, read this book. You don't have to hold on to whatever shame is choking you. Shame is not His purpose for you.
If you are someone who has never really thought about shame, read this book. Ask God to reveal to you any hindrances you might not be aware of. Chances are there is something you are dealing with that you would never have associated with shame. And remember the enemy is crafty and looking for some way to knock you down. This book helps you to prepare and remind you that you don't have to ever let shame win again.
"We are meant to live--truly live--unashamed of who God made us to be--today."
"Shame off you!"
Click Here to buy today.
By Esther Fleece
Suck it up. Fake it til you make it. It's not really that bad. What will people think? If people really knew...
All these statements have probably either been said to us or by us to ourselves. I know so many of us try to cover up all our junk, stuff in the pain, put our best face on and never let anyone know what is really going on.
Esther Fleece wrote this book to give us the go ahead on giving ourselves permission to not be okay all of the time. She wants the word lament to become part of our vocabulary and life. We don't need to be self-sufficient and fake, especially to God, who knows all and desires us to share with Him our raw honest prayers.
Ask yourself this: "How many of us mistakenly believe that our strength is what God wants from us, when it is our brokenness that actually attracts Him most."
When life doesn't go the way we wanted or tragedy hits that doesn't mean that God is punishing us. God grieves with us. Esther says "Pain can serve a purpose if pain leads us to Him".
Esther shares her personal story of the scars that growing up in very negative environments left on her. How she sucked it up until she couldn't anymore. And then she learned the process of lament. She says that "the greatest gift that has come from my suffering is a deeper understanding of the character of God and His thoughts toward me."
God wants to be in relationship with us. He wants us to share our sad. He doesn't want us to learn to cope with our pain. "Coping is a cheap substitute for healing." And God wants to heal us. Healing is a process and it isn't an easy one. It is okay to ask Him hard questions. "He'd rather have my honest questions than my faked spiritual strength."
We make ourselves believe that if we do lament that it has to be a private thing. We don't want anyone to know our weaknesses. Esther says that "isolation is one of the most harmful thing we can do to ourselves." It is important that we do open our hearts that it is to people who love us unconditionally, so we need to have those people in our lives. "There is a divine healing that occurs when we confess things to other people. The enemy doesn't have as much power to play around in our minds when our laments come to light."
Going through the process of lament is vital to healing, but eventually the season of lament comes to an end and our lives with hopes and dreams can take flight. "God wants our sad for a reason: He wants to give us something new in return." We draw closer to Him and we learn to have compassion on those who are going through the lament process. We learn to worship God in all seasons.
Remember this:
"God's grace meets us where we are, not where we pretend to be."
Purchase your own copy of No More Faking Fine.
PLAY WITH FIRE
Discovering FIERCE FAITH, UNQUENCHABLE PASSION, and
a LIFE-GIVING GOD
I had the privilege of being on the book launch team for Bianca Olthoff's debut book Play With Fire. I loved it!
I'm a story girl. I love to tell stories. I love to hear stories. Stories are how I relate to everything. I enjoyed history class when it was all about the stories--not so much when I needed to remember the dates. And I love that Jesus taught important heavenly topics in parables. He wanted everyone to be able to understand and relate to them.
Bianca wrote this book as her personal story. She tells it in a way that allows you to really dive in and feel her heart. When I was done reading it, I felt like I really knew her.
I was able to relate to her even though my story is nothing like hers. We all go through desert experiences and though my deserts have been different than hers, I connected with the pain and longing of the heart.
Bianca often refers back to the story of the Isrealites. Moses brought them out of slavery and got them to the Promised Land but fear and lack of trust in God prevented them from entering it and left them wandering in the desert for 40 years. Even while they were in the desert God was providing for them daily, but their hardness prevented them from seeing His goodness.
We all go through our own deserts and I think a lot of us feel very alone. Our heads know God is there but our hearts don't always remember. It feels like His silence is Him ignoring us or not caring. Really though, He is still providing for us (we just don't notice) and He is waiting for us to surrender and call out to Him. We go through deserts and fires and are refined. They are not fun times, but they bring us to a better place.
Bianca talks about growing up very poor, being bullied as a child, wanting to fit in and belong. She moves on to the desire for control-- Controlling any area of your life so that you look your part no matter how big of a mess you are secretly.
She was pretending to have it all together through college, in an unhealthy relationship, and then her mother ended up with cancer. She was stretched past her capacity and relying on herself instead of God. We were not designed for that kind of pressure. God wants us to surrender that control so that we don't have to worry about handling such heavy burdens.
At that point Bianca totally surrenders. That didn't happen in a moment though. Complete surrender is a journey too. It takes swallowing pride, admitting weaknesses, and stepping out in uncomfortable ways. As she goes through this season she starts to really tune in to the Holy Spirit and starts experiencing God in powerful ways.
Her story moves from pain to transformation. Through fire being refined. From control to trust and surrender. From knowledge of the Holy Spirit to experiencing Him fully. She has an inspiring unquenchable passion for our God who is always there.
This book left me with a more personal connection and understanding of the Old Testament, desire to experience God more, and inspired to live fully surrender.
Play with Fire now!!!
Stocking up…
I have a very unpractical hobby…hand sewing felt. Stockings are my favorite. It is tedious, insanely time consuming, not cheap, and you can only keep so much of it. A stocking can take anywhere from 20-40 hours to make. When you have a family of four, I have to wait around for people to have babies until I can make the next one. And I don’t know that many people having babies currently. I did start making ornaments, but again you can only have so many felt ornaments. As terrible as I just made it sound, I enjoy it so much. I’m not one for sitting still. I don’t like to just sit and do nothing but chat or sit and watch television for hours on end, but with my stitching projects, my hands are occupied so that I can actually enjoy things that require me to sit still. That and I love seeing how slowly with each color, sequence, and bead they go from boring to beautiful.
One of the hardest things for me to lose during our fire was our stockings. Mine was the one my grandmother made me when I was a baby. And I had made the other three with much love, time and pin pricks for my family. I hadn’t taken down our Christmas decoration, so when I was allowed to go into the house, my heart broke to see what was left of the burnt up threads hanging there.
One of the hard things about the fire for our kids was remember, thinking back at what they lost. So as the mom, it was my job to guide them through the process of grieving and moving forward. So what I decided was for us to have things we look forward to. I gave them two projects. We started planning their bedrooms and they got to pick out their new stocking pattern. We spent so much time at Sherwin-Williams and scrolling stockings on Amazon and eBay. My oldest wanted his paint color close to their old color and his stocking to be the exact same. My youngest wanted everything different, thus so many hours of searching.
So these are what we ended up with.

If you enjoy long tedious projects that end with beautiful projects, felt crafts are the thing for you. These are some of my favorites. I just need somebody I know to have another baby!

We’re a homeschool family, but not the kind that sits around and does worksheets in their school room. Our focus is on doing life together and learning life skills.

When our house burned down we needed to find a new permanent dwelling. Our insurance only gave us so much money and we had the option to rebuild or buy something elsewhere. We love our area and community and so we decided to rebuild on our site. We started with a hole in the ground and ended up with a beautiful home. It is quite a process to get there. The company we went with to build our home was great to work with. They are a family company and were totally cool with us being onsite while they were working. They even allowed my kids to help do some of the work. They can walk through our house and tell you which walls they helped put up and they are so proud of it. It really helped make them feel like this was indeed their home.

Since I knew we would be building our house, I decided to make that our school for the year. We as a family learned all about what it takes to build and make a house work. We studied measurements and fractions and angles. We learned about the science of electricity, along with the history and wiring of it. We learned about foundations, plumbing, types of wood, and color therapy. Everyday I took lots of pictures and the kids had to write about what all took place during the day. Neither of them are big fans of writing, but I told them to write enough that they could trigger their memories so they could put their book together at the end. I also had them learning to type. When the house was FINALLY finished and we got to move in, they read their notes, realized the importance of penmanship (yikes), and typed up their books. I then showed them how to use Shutterfly. They learned about inserting text boxes and editing pictures. Then when I got my coupons for a free book, they each got a hardback book of their experience of building a house. It was a once in a lifetime project.
No, they didn’t sit at a desk, but as I told my husband, “I don’t remember 5th grade science, but these kids will never forget that year of “class”."
I am a leader in an organization called Grit & Glitz. It is a networking community for local women, many of whom are involved in small business or leadership in the community. Our goal was to not hide the grit/hard work that it takes to get to the pretty outcome. It takes a lot of behind the scenes effort to get to the picture worthy post. So I wrote this as an encouragement to them and anyone else who needs to hear it.
You want to talk about Grit...I've experienced a whole new level of it. When my house burned and everything was destroyed, I had two choices. Be broken from my tragedy or rise from the ashes, literally. I thought I had some grit just being a mom of boys, but it takes you to a whole new level when you have to drag them out of the ashes with you.
Since we lost almost everything in the fire, people have blessed us with clothing and other things that we need to try to get back to a normal life. One of the shirts that a lady had made for me says G.R.I.T.
GUTS. RESILIENCE. INITIATIVE. TENACITY.
That is exactly what it takes to walk through the rubble that was my safe place. Most of you won't experience my literal ashes but you will face many different roadblocks. It is going to take G.R.I.T. to face them and overcome but you are not in this life alone. God is always there and He has surrounded us with people who can support us along the way. You still have to dig in your heels and walk the road before you, but don't let it break you.
Keep Going!

But we were so glad when it quit burning. On January 7, 2022 our home burned and our lives changed forever. If I’ve said it once, I’ve said it 100 times, I have learned the strangest lessons in the most unexpected circumstances.
That day I experienced shock, panic, fear, disbelief, frustration, helplessness, and complete lack of control. When I saw the smoke in the house, and found my way to the flames in the basement, I could hardly believe what I was seeing. Then I went to get the fire extinguisher and it was not where it was supposed to be. (FYI…baking soda only works on small grease fires, not raging basement fires.) Absolute panic when the fire hit the gas line and headed toward the furnace. Amazement that I could run that fast to escape an explosion. Strength when I physically grabbed my children out without stopping to get shoes for either of us. Helplessness as I stood in my front yard alone watching my house burn until the fire department was able to get there, which took a while since we live out of town. Disbelief as the Amazon man handed me my package and said he was sorry. I could only respond “me too.” Fear when the smoke inhalation caused a cough that I couldn’t stop. (This is Us, was not comforting me for killing off Jack that way.) Besides all of those personal things, I also had to make the phone calls after 911. “Hey husband, I need you to come home from work because our house is burning down.” It's not an easy call to make. And then to have to make it to our parents and siblings. And to suddenly be “homeless”, not knowing what is going to happen next. I would like to make it clear that we were not actually homeless because “home is where the heart is” and we have loving family on both sides who moved us in with them. My parents during the week and my husband’s mom on weekends. We were never left to the elements, but we were without our own space and own belongings.
But the shocking thing that I learned through losing our house and belongings, was thankfulness. Number One, God protected me and my family and we all walked away safe and sound. Thankful that the fire happened during the day and not the night because we could have ended up with a much more tragic outcome. Number two, The gifts and hand-me-downs came rolling in that very night and the next few days. The Amazon truck was at my parents house every day with things that people knew we needed. Knowing the amount of people that cared for us, even from afar touches you in a way you don’t expect.
And with no option of going back, we started over. One step at a time, little by little, our lives began to move forward.


